Thursday, June 27, 2013

Dreamweaver Stencils and Ranger Team Up!

Collaborations are always fun, and when you get to partner with Ranger its a blast!  The Dreamweaver Stencils DT is thrilled to be sponsored by Ranger this month and using the Stickles Dry Glitter in our creations this week.


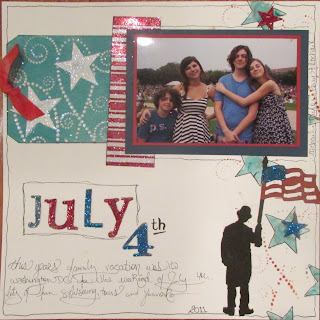
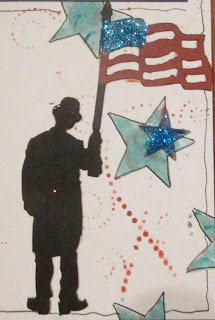
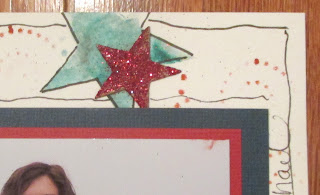
Today I have a layout for you that utilizes two different ways to incorporate glitter into your stenciling.   On a #10 Ranger Tag I spritzed Blue Martini Memories mist and then when that was dry I stenciled the Stars onto the tag in White Glossy paste.  While that was still wet I sprinkled on Stardust Stickles dry glitter.


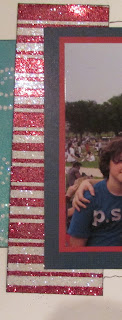
I also grabbed my Plaid stencil since I needed stars and stripes, right?  Using this stencil and double sided mounting paper I created a piece of cardstock with Christmas Red and Stardust stripes.


In the bottom corner I added the Umbrella man die cut from chipboard, but cut off his umbrella and added the flag from Mini Old Glory instead.


Also along the right border I sponged Fired Brick and Tumbled Glass Distress ink through my Stars stencil.


Dreamweaver Stencils products:

Ranger Products:

Other Tim Holtz Products:
Crinkle Ribbon 

So what about prizes for this week's hop?


Just visit everyone on the list below, and leave comments for everyone. Two winners* will be randomly selected and announced Thursday, July 4th...what a great day for a celebration! Each prize package includes a mix of five Ranger Stickles Dry Glitter, a mix of six Dreamweaver Stencils, and jar of Dreamweaver Translucent Paste, and a Palette Knife for spreading. If you want to add to the fun, play along with our Pinterest challenge and link your own creation to the linkytool on the Dream It Up! blog before July 1st for a chance to win this month's stencil prize. Here's the list of sparkly-Pinteresting players:

Wednesday, June 26, 2013

Surf's Up: New Stampendous Summer Kiddos

The Stampendous DT is showcasing the newest Kiddos on the block all this week.  Be sure to head to the Stampendous blog to see who else is playing along!

I have a couple of quick cards for you today...the first is with Sandcastle Kiddo.  She totally makes me miss when my girls were itty bitty!  She's been colored with my Spectrum Noir markers and is finished off with one of the phrases from Soaring Sentiments.


And here's her little friend Surfer Kiddo ready to catch a wave:


Thanks for popping by today!  Happy hump day :)

Sunday, June 23, 2013

Scrappy Sunday with stencils

 Happy Sunday!  I am up today for this week's Scrappy Sunday Challenge at Paper Craft Planet!  Today I am challenging you to use stencils on your layouts!  Here's my page for today:


I also pulled out some fun chipboard from Technique Tuesday thats been sitting in my stash forever and painted these with the same colors of Silks.


Be sure to head over and join our challenge this week and give us a link to your creation so we can see what you've been up to!

Friday, June 21, 2013

Stampendous and Armour Etch Blog Hop day

Today is Blog Hop day with Stampendous and Armour Etch!  Hope you've enjoyed all our frosty goodness this week :)  Today I thought I'd do a frame for you all:


I started with a 12x12 frame and pulled the glass out then masked off a large 5x7 area in the center with contact paper.  I embossed the border from Spring Bouquet just under and over the center piece in Clear Bark EP.  (YES! The bark peels off beautifully after the etching!)  My lines around the contact paper are nice and crisp and the reverse stencil created with the embossing looks great, but my surface was so large that I etched that its a bit blotchy.  I *think* I can go back and fix that :)


The contact paper was a bit tough to release (I liked using the painters tape better on my other projects) but Goo Gone finally came to the rescue!

Again, sorry for the bad photos, the frost on the glass is beautiful but subtle and glass is so hard to photograph!

Here's the list of who's hopping today. Please go check out their projects and be sure to leave a comment that includes where you're commenting from. Remember that only folks with a U.S. address can win, but we are super delighted to hear your thoughts and see your projects no matter where you live!

Asia King

Janelle Stollfus

Kristine Reynolds

Lea Kimmel

Tobi Crawford

Rhea Weigand

Jamie Martin

Krissy Fossmeyer

Thursday, June 20, 2013

Dreamweaver Stencils Pinterest Inspired Color Palette

Its Thursday and time for another round of this month's Dreamweaver Stencils challenge!  Be sure to join us this month for a chance to win...its super simple...just create a project inspired by something you found on Pinterest!

Today I have a card for you using one of the newest stencils...Shasta Flower.  I love flowers and this one is just fabulous!  A little retro, a little funky, and ton of things you can do with it!


I started with a red paper that I sprayed Fruit Punch Memories Mist through the Large Flourish Stencil onto.  The Memories Mists are awesome if you haven't used them before...a bit thicker consistency than other sprays and great for transferring ink from the stencil onto paper for the "negative" image.

After that was dry I stenciled the Shasta Flower in White Glossy paste directly over the top.  I let that dry as well and then reapplied my clean stencil back over the top.  I added Versamark ink through the stencil with a giant dauber and then rubbed on Metallic F/X powders with a q-tip (I used Moonstone, Ivy, Kimono Red, and Pink Poppy).

HERE is the pin that inspired the color palette:


Thanks for popping by and be sure to go leave some leave at my fellow teammate's blogs this week!


Wednesday, June 19, 2013

Etching the summer away with Armour Etch and Stampendous


The Stampendous girls are etching glass this week with Armour Etch!  Be sure to hop over to the Stampendous blog to see who all has been playing along this week and the prizes for hopping along with us.  Also be sure to leave comments at everyone's blogs for chances to win!

Glass etching is so easy and fun! (There, I said it!!)  BUT I want to share a couple of tips that will make your project sooo much better.  (Full directions for etching with stamps, compliments of Stampendous, is at the bottom of this post.)

My first project that I created is a candle which would have been gorgeous, LOL, but here's my first tip: Don't emboss your image on glass where the candle is already inside!  It melts the candle in those spots and gives you a weird consistency in that area so that it is hard to see your gorgeous etching!
(Also, I used White Embossing Powder which didn't rub off quite as easily as Bark or Gold I found out later.)


For this one I started with a large candle in a jar and stamped and embossed Jumbo Songbird.  The large chunky image worked as a great mask for the etching!


But since I managed to melt the candle its really hard to see in a photo now!


So I made two little shot glasses too!  (OK, so they're really votive holders but hey!)


On these I used Fantasy Tiles and then masked off the area around them with contact paper and a square punch.


So now I've learned a few minor lessons before our hop on Friday and hopefully I'll figure out a better way to photograph this gorgeous effect too!


Also posting today:

Lea Kimmel

Tobi Crawford


How to etch glass the Stampendous way (of course you can do it another way if you like...ahem... Jenn):

Find your piece of glass – it’s a bit easier if it’s flat, but with cling you can work around a round surface. Go to thrift store, or you can use a mirror as well. - get two or three...you’ll want to try one first.

Clean your glass – with rubbing alcohol

Stamp your image – with versamark OR a colored pigment ink like ColorBox or VersaColor – color won’t matter – but image does. Choose something with clear, well-defined lines, not toooooo detailed.

IF you don’t like your image, clean with rubbing alcohol and repeat as often as necessary.

Emboss your image with ANY color powder (but probably not chunky ones). Heat carefully, some thin things like glasses and christmas ornaments can break if heated too much.

Now – your image will be the part of the design that is NOT etched. So get a piece of contact paper and cut a frame with a Spellbinders die or something like that, that your image fits into.

Place the frame on the glass around the stamped image.  Smooth it down very well leaving no gaps or bubbles along the frame edge that etching cream could seep under.

Apply etching cream with a slightly dampened sponge brush. You may want to do this outside, it kinda smells, keep the coat very thick and even, working on a small area at a time. Work quickly.

Wait one minute – more isn’t better. Then take your glass thing to the sink and rinse under warm water simultaneously washing away ALL the embossing powder. 

Remove the contact paper – TA DA!!  You will get soooooooooo addicted to this. I promise... You thought resin was addicting. Look out world!

Photography – you can use Rub N Buff (available at Michaels) to rub into your etched part to really make it pop... Putting a dark surface inside your project can help, too. 


A link to the online instructions including a video

Tuesday, June 18, 2013

Stenciling on Canvas with Silks and Primary elements Tutorial

Good morning peeps! Today I am sharing a little canvas with you that started as a "mop up" and then it kept calling me to finish it!
                      
  TCW-tut-final

I began with a small 6x8 canvas which I prepped with Matte Gel medium, Tim Holtz tissue paper, and then more medium.  The background is a color wash of Silks acrylic glazes in African Jade, Moonbeams, and Stargazer) from Splash of Color.  The silks are a luscious semi-transparent shimmery paint that dries almost immediately. 

   TCW-tut1 

 Next I prepped two piles of Champagne Modeling Creme by adding Primary Elements pigment powders to each (one with Teal Zircon, the other with Ocean Waves).

  TCW-tut2

I masked the words off of the top of my Urban Landscape stencil from TCW with painter's tape and then spread the creme mixture through the skyline.

  TCW-tut3

This is what it looked like at this point: 

  TCW-tut4

  I used the other color of embossing creme that I created to stencil the Subway stencil onto the background.  I heated both parts for a few seconds with my heat gun since I'm so impatient.

  TCW-tut5   

 On a scrap of pattern paper I stenciled one of the cameras from the Picture Perfect stencil with a black Pearl pen from Viva.  I made a small puddle on my craft mat and then laid it over the stencil with a makeup sponge.   

  TCW-tut-close-4

My skyline looked a bit lost so I traced the edges with a black pen.

  TCW-tut-close-3

OK. so this adorable little "Today" diecut?  I know I cut it at a workshop with Jaime but I can't find it on the TCW website so maybe I'm sneaking you a peek of something top secret!  (The watercolor paper was sprayed with Radiant Rain before being die cut)

  TCW-tut-close-2

Finally I added a few words to my canvas.  I unmasked the words from Urban Landscape and stenciled them with the same black Pearl Pen then cut them apart and glued them on.

  TCW-tut-close-1

I used the cute little Prima doll stamp by Julie Nutting for my focal image.  She was stamped once on text paper and then again on a sheet of Art Journal pp from Prima.  The dress and headband were cut out and then I ran a thin layer of Moonbeams silks over both of these pieces to add a touch of shimmer.


I placed her on a partial #10 tag from Ranger...this was first painted with Twinkling H2Os in Lucky Apple and Sea Spray and then I stamped the globe from Tim Holtz's Travel Blueprints stamp set in archival black ink.


 Hope you enjoyed my little adventure! My local girls are already asking when this will be a class, so I will whip up a few more similar samples and schedule that soon!

Monday, June 17, 2013

Project {Stenciled} Life

Good morning!  I am thrilled to be Guest Blogging today over at The Crafter's Workshop!  I was lucky enough to take a class with the owner, Jaime Echt, when I attended the Collins Show in April.  She is one fun energetic fabby lady!


So I created a Project Life layout for my guest post today.  You can read all about it HERE.  My pages are using the pics I took from my long weekend at the Collins Show.


The Crafters Workshop stencils:
Cityscape 12x12 and 6x6
Urban Landscape 6x6
Subway 6x6
Weekly Circles 6x6
Casey and Penelope 6x6
Eye Chart 6x6
Pie Chart 6x6
Church Windows 6x6

Ranger  Dylusions ink sprays:
Dirty Martini
Vibrant Turquoise
Squeezed Orange
Bubblegum Pink

Picked Raspberry Tim Holtz Distres paint (Ranger)
Adirondack Black Paint Dauber (Ranger)

Becky HigginsProject Life
 page protectors (American Crafts)

White sharpie paint pen
Black Faber Castell fine tip pen


Friday, June 14, 2013

Stampendous Fathers Day Week and Encrusted Jewel Challenge

This week the Stampendous Design Team have been showcasing masculine cards with the newest releases and today I have a card that I created with the new Motorcycle Elements stamp.  You've gotta love these new Elements stamps and I especially love this one...its calling me to make a scrapbook page too!


I stamped the image in Versamark ink then embossed it with Detail Black EP.  The open parts of the bike are colored with BG5 Spectrum Noir.


I added a touch of Aged Black EP sprinkled around the card and then encrusted the bottom with Aged Teal EP and Teal Color Fragments from the new Teal Encrusted Jewel kit.


My papers are all Bazzill, the cardstock and the fun herringbone and striped papers.  Brads are from my stash, also from Bazzill.

It's also all about encrusting this month for our June Challenge at Stampendous...check out the details HERE.  Have a happy weekend and go Hit the Road!

Thursday, June 13, 2013

Happy Fathers Day

I'm playing along again this week with the monthly Dreamweaver Stencils Challenge.  You may have noticed that our team is now split into an A and B group but sometimes we hop on board an extra week!  We also have the lovely Jenn Dove as a guest this month.

Our theme this month is "Pinterest Inspired" so this is an easy one for you to hop in and join us!  Just use any pin from a Pinterest board as your starting point.  I used a card from the fabby Pam as my inspiration.


I used the Paisley stencil for my blue background which was dry embossed on Core'dinations cardstock and then sanded with my sand It gadget.

The Necktie stencil I dry embossed twice: once on white (you can barely see the raised shirt collar in the pic sorry!) and once on dark green.  I then added the Paisley stencil over the tie stencil on the green and applied blue and green distress ink through the stencil with sponge daubers.

The fathers day sentiment is  a stamp from Guys and Gears by Stampendous.  And below is the photo of Pam's card from the Dreamweaver Stencils Pinterest board:


Here's the list of this week's players so be sure to hop over and see what they have created for you:


Monday, June 10, 2013

Twinkling H2Os meet Silks

Good morning!  I am up today with the Monday tutorial on Paper Craft Planet.  Today I wanted  to share some fun techniques with Twinkling H2Os and Silks from Splash of Color!  Twinkling H2Os have been around forever and we all used to watercolor with these gorgeous shimmery paints.  But there has recently been a new resurgence of love for this product since Splash of Color (formerly Creative Imaginations) took over the product line from Luminarte.  Now its all about the possibilites of using these babies in Mixed Media!

Please head HERE to see the tutorial on how I created this background in my Art Journal.


I left this background as a base in my Art Journal and I will add to it later.  When Art Journaling sometimes I just love to create backgrounds, sometimes I am experimenting with new products or techniques, other times I add some doodling or journaling when I find a fabulous quote.  My journal is always an ongoing project!

Products Used:

Friday, June 7, 2013

Blog Hop with Stampendous, Core'dinations, and May Arts

It's the big blog hop today!! Stampendous, Core'dintions, and May Arts have been working together all week to bring you some really fun projects and I hope you've enjoyed them!  Details on the prizes and HOW to win are below so be sure to click on this post for all the details!


I created a layout for you today starting with a Core'dinations cardstock base.  I added a couple of pieces of Black Magic core'dinations that were embossed with Dreamweaver Stencils (Houndstouth and Mosaic Swirls) and pics layered on more Core cardstock.


My tags are from the David Tutera line for Core'dinations and are stamped with Life is Art and Dream Text.  I also added some Aged Black EP and Color Fragments in Teal, Hot Lime, and Hot Blue.


Under the Life is Art tag I added lots of strips of fun May Arts ribbons!


Be sure to comment on each blog to increase your chances of winning! Also be sure to visit our Facebook Page and share one of this week's Blog Collaboration posts on your Timeline for an EXTRA chance to win your choice of a spool of May Arts Ribbon or a tag set from Core'dinations! Let's Review: The Blog Hop Prize package from Stampendous consists of: 

CRS5044 Cling Jumbo Butterfly Trio

CRS5044 Cling Jumbo Butterfly Trio

SSH57 Cling Jumbo Handle

SSH57 Cling Jumbo Handle


A random selection of David Tutera Celebrate Products Available at JoAnn Fabric and Crafts

A random selection of David Tutera Celebrate Products Available at JoAnn Fabric and Crafts
A Sand It Set from Core'dinations

A Sand It Set from Core'dinations

A random asst. of May Arts Ribbon from our stash - This is Ribbonista Virgina Fynes photo of her storage method!

A random asst. of May Arts Ribbon from our stash - This is Ribbonista Virgina Fynes photo of her storage method!

THEN - the May Arts Blog is offering us an opportunity to give a way ANY two rolls of May Arts Ribbon! So if you SHARE our Collaboration Posts from our Facebook Page on your Facebook timeline, you will be entered to choose one of those! ALSO - the Core'dinations Blog is offering us two sets of tags for this as well! So FOUR people who SHARE our Facebook Posts will each win one of these. You have to SHARE, not just comment, not just "like", you must SHARE. (and we can tell if you did!). So here we go!

Asia King

Cyndi Bundy

Jamie Martin

Jennifer Dove

Krissy Fossmeyer

Kristine Reynolds

Lea Kimmel

Rhea Weigand

Tenia Nelson

Tobi Crawford

Karen Baker

Sandy Allnock

Virginia Fynes

Debbie Standard

Kim Moreno

Mary Pat Siehl